Pages

Sunday, May 13, 2012

Note Cards | Flowers

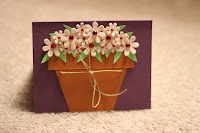
For When You Can't Send Real Flowers... 

Sending flowers is such a wonderful way to show someone that you are thinking of them.  For those that a flower delivery truck is hard to reach, but a mail box isn't, these cards might just be a cute solution.
Flower note cards
 To make the card:
  1. Use pre-made, plain cards or cut a card out of plain card stock that will fit your envelope.
  2. Using brown card-stock, cut the basic flat bottom "V"-shape of a pot.
  3. Cut a strip of the same colored brown card-stock that is the width of the widest part of the flower pot base and attach to your flat bottom "V".
  4. Punch two holes just slightly below the ridge you created in step three of equal distance.
  5. String a piece of twine, rope or jewlery thread and tie a bow.  Using twine proves to be a little less manageable.
  6. Using a piece of green card stock either hand cut petals for your flowers or use a paper cutting machine.  Sparadically place around the top of your pot.  If you really want to add some character to the card, you can use a green marker to draw in the veins of the petals.  
  7. Using pre-made flowers of two different sizes or creating your own through a stencil or paper cutting machine, have enough to create a full arrangement of flowers for your pot.
  8. Either use button brads/tacks, sticky jewels, or sew real buttons  of coordinating colors to attach to the center.
  9. Attach both size flowers evenly around your pot even using foam stickies that will elevate some flowers and petals from the card.  
  10. If you have any remaining flowers and petals, attach to the inside of our card.
  11. Write your sweet message, put in your envelope, slap on a stamp and put in the mail!
NOTE: If you want to put some extra love into the card, you could punch holes around the edges of the pot and use an almost matching in color thread to stick around.  You could also use an almost exact color green thread to stitch the veins of the flower petals as well. 


Saturday, May 12, 2012

Birthdays | Year Round

Though I'm sure two year-olds are far more interested in ripping open gifts and chowing down on a sugar filled cake, a little birthday card sent with love just adds to the magic of the great day!
Second Birthday Love
 To make the card:
Inside of Card
  1. Cut a plane piece of card stock out that fits the size of your envelope.
  2. Cut a base patterned piece of paper that will coordinate with your color scheme, slightly smaller than your card size.
  3. Choose a piece of patterned paper of a different color and cut various sizes of the birthday year (in this case, a handful of number twos).  Attach the numbers sporadically around the base square from step two.
  4. Punching holes in even lengths around the base using an awl or needle over a piece of old cork board, thread a coordinating color of thread around the card to give it a stiched look. 
  5. Choosing a dark piece of card stock with a subtle pattern, cut out the words "appy" and "irthday" either from a stencil or by a paper cutting machine, and attach to your card.
  6. Cut out the letters "H" and "B" from the same paper used in step five, but larger in size from your words in step five.
  7. From a bright piece of patterned paper, cut out the letters "appyirthday" from a stencil or using your paper cutting machine. Attach letters to the base words cut out in step five.
  8. Choosing a coordinating paper, cut out the letters "H" and "B" slightly smaller in size from those cut out in step six. 
  9. Using an awl or needle over a piece of cork board, punch holes around the edge of your letters from step eight and thread a piece of coordinating thread to give the stitched look.  Attach letters to their bases and then attach to card.
  10. Punch two holes in the remaining space of your card and cut a piece of twine or jewelry making thread. Thread through holes and tie a bow.
  11. For the inside of the card, use the same paper from step eight and cut to slightly smaller than the width of your card. 
  12. Punch holes around the edge of the rectangle from step ten with an awl or needle over a piece of cork board and thread a piece of thread through the holes.  Attach the rectangle to the card
  13. Cut a piece of cream colored card stock to write our sweet birthday message on.  Attach to the center of the inside of card.
  14. Using the paper from step two and three, cut the birthday number of various sizes and place around the boarder of your message box from step thirteen.
  15. Put in your envelope, add a stamp, give it a quick kiss and send it off!

Friday, May 11, 2012

Independence Day Post Cards | 4th of July

Red, white and blue might just be the oldest color pallet in the book, and doesn't it make for a great color scheme for super simple post cards!
Red, White and Blue Post Cards
 To make the card:
  1. Cut out a post card sized card or use a pre-maid post card purchased from your local craft store.
  2. Find red, white and blue paper that fits a pattern scheme and feel you are going for.
  3. Divide the width of your post card and divide by four to get the thickness size of your stripes.  Cut the lengths of the stripes to the length of the post card. Adhere to your post card..
  4. For the blue box, take the width of a stripe and double it to get your width.  For the length of the box, divide the length of your post card by two.  Cut your blue box to your measurements.
  5. Purchase star shaped brads/tacks from your local craft store.
  6. Punch holes where you want your stars to be positioned.  To punch the holes, use a needle or awl to punch the hole through the blue paper while sitting it atop an old cork board or a piece of styrofoam.
  7. Attach your brads.
  8. Attach your blue box with stars to your card in the upper left hand corner of your post card.
  9. Write your super sweet happy Fourth of July message to your loved one on the back.  
  10. You can either slap on a stamp to the back of your card and send, or put in a velum envelope (purchased from your craft store) that will fit your post card and send that way.   

Sunday, May 6, 2012

Birthdays | Year Round

For the birthdays you can be there for in person, there is nothing wrong with sending your love through the mail.  
A Very Girly Happy Birthday
 To make the card:

1.  Cut your card out of plain card stock that fits your envelope.
2.  Cut a base out of complimentary paper with a design and attach to card.
3.  Using your paper cutting machine, cut out a lace pattern out of a color that will "pop" off your base color and attach.
4.  Cut your "Happy Birthday" letters out using paper that compliments the given color pallet.
5.  Cut out another set of "Happy Birthday" letters that are slightly smaller than your letters from step four.
6.  Attach step five letters to step four letters and then attach to your card.
7.  Either purchase an embellishment that fits the design of your card, or make your own and attach.
8.  On the inside of your card, cut a square of background paper that compliments the front of the card.
9.  Cut a smaller square out of plain card stock that compliments your color scheme.
10.  Punch holes in the corners of your square from step nine with a tooth pick, awl, needle.  Attach button shaped brads/tacks that match your color scheme.
11.  Attach your square to your square from step eight.
12.  Using embellishments found at your local craft store or hand made, attach your card.
13.  Write your sweet birthday message on the inside, put in your envelope, stick a stamp on and send it off.


Happy Birthday Lace
To make the card:

1.  Cut your card out of plain card stock that pits your envelope.
2.  Using a paper with a bright pattern, cut a square just slightly smaller than your card size and attach.
3.  Using your paper cutting machine, cut a lace pattern that fits the design of the card and attach.  Make sure the paper you use for your lace will not blend in with your base paper from step two.
4.  Cut "Happy Birthday" letters out of a base colored paper using a paper cutting machine or with a steady hand and stencil.
5.  Cut "Happy Birthday" letters out of a light colored paper that are slightly smaller than the size of letters cut in step four.
6.  Attach step five letters to step four letters, and attach to the card..
7.  On the inside of the card, use that paper that you cut your lace from and create a large square slightly smaller than your card size.
8.  Cut a square of lightly colored paper just smaller than that cut in step seven.
9.  Punch holes in the corners and middle sides of the square from step eight with an awl, tooth pick, needle on a piece of cork.
10.  Attach your button shaped brads/tacks that are of a complimentary color to the square from step eight.  Attach square to larger square.
11.  Write your birthday message, put in your envelope, slap on a stamp and send it off.


Father's Day | June 17th

Just like moms, we wouldn't be here without our dads too.  And while a card isn't a new tool, new car, or other new toy, it is still sending your love to one of the most important guys in your life. 
Father's Day Love
 To make the card: 
  1. Cut a plain color of card stock to fit your envelope.
  2. With a base paper, cut a rectangle out just shy of your card's front size.
  3. Cut a strip of stripped card stock that matches your base paper.
  4. Using a paper cutting machine, or a steady hand and stencil, cut out your "DaD" letters.
  5. Using a paper cutting machine, or a steady hand and stencil, cut out another set of "DaD" slightly smaller than the ones cut in step four. 
  6. Attach step five letters to step four letters and then attach to card.
  7. Like step four, cut out "No" in a paper that will "pop" off your base paper and attach. 
  8. using the hole from one of the "D" top paper layer, attach to card right after "No".
  9. Like steps four and five, cut out a number one of substantial side in comparison to your other letters and then attach like step six.
  10. On the inside of the card, cut out a complimentary paper in a rectangle to serve as a mat.
  11. Cut out an ivory colored rectangle slightly smaller than your mat and poke holes in each corner. To make the holes, use a tooth pick, needle, awl, something sharp.  Punch holes on a piece of cork so it does not damage your table or work surface. 
  12. Use brads/tacks that compliment the color pallet of the card and insert in the punched holes.  
  13. Attach message your ivory colored rectangle to your mat created in step ten.
  14. Write your message, put in your envelopes, attach a stamp, give it a quick kiss and send it off.

Saturday, May 5, 2012

Mother's Day | May 13th

Mothers are the reasons we are here.  Everyday should be Mother's Day in my opinion.  But for the special day marked on the calender, send a little hand made love!
Mother's Day Love
Various color options
To make the card:
  1. Pick a background color for the card body.  Make sure to cut to the size of your envelope.
  2. Using your background color, pick a color pallet with your papers.
  3. Pick a pattern from your paper cutting machine cards and cut your lace with a background.  Attach to card.
  4. Punch holes on the other side of your cut out design for your ribbon.
  5. Using a little under a foot of ribbon, string the ribbon from the inside of the card and tie a bow.
  6. Using left over paper from your cut out lace, cut a strip and attach to the inside of the card.
  7. With a light color, cut a rectangle large enough for your sweet message.
  8. Punch holes in the corners of your message rectangle and attach matching colored brads/fasteners you can get from your local craft store.
  9. Attach your message rectangle to the inside of the card.
  10. Put in your envelope, add a stamp, give it one last kiss and send it off. 
Various lace patterns.